


GENNECT Space Getting Started Guide
GENNECT Space Getting Started Guide
Start Bringing Your Measurement Data into One Workspace
Your Measurement Data Space Starts Here
Integrate your Hioki instruments into a seamless ecosystem to capture, analyze, and secure high-fidelity data. Transform raw signals into the insights required for advanced research and development.
This tutorial guides you through the basic workflow so you can start collecting data with confidence.
This guide is designed for first-time users. By the end of this tutorial, you will be able to complete the basic measurement workflow and successfully save your data.
An Overview of GENNECT Space User Guide
- 1. Preparation of your instruments
- 2. Prepare your Gennect Space
- 3. Connect the measuring instrument
- 4. Set your Logging Conditions
- 5. Start Measurement
- 6. Save Recorded Data
Once the data is saved, you can use it later for review, analysis, reporting, or export.
1. Preparation of your instruments
First, let's make sure the measuring instrument is ready.
1. Verify Your Instruments Are Compatible
Verify that GENNECT Space supports your instruments.
> Latest supported instruments
2. Update Firmware
Please update the measuring instrument's firmware to the latest version.
> Download Latest Firmware
3. Prepare a LAN Connection
Prepare the LAN cable and hub needed to connect your PC and Hioki instruments to the same network.
2. Prepare your GENNECT Space
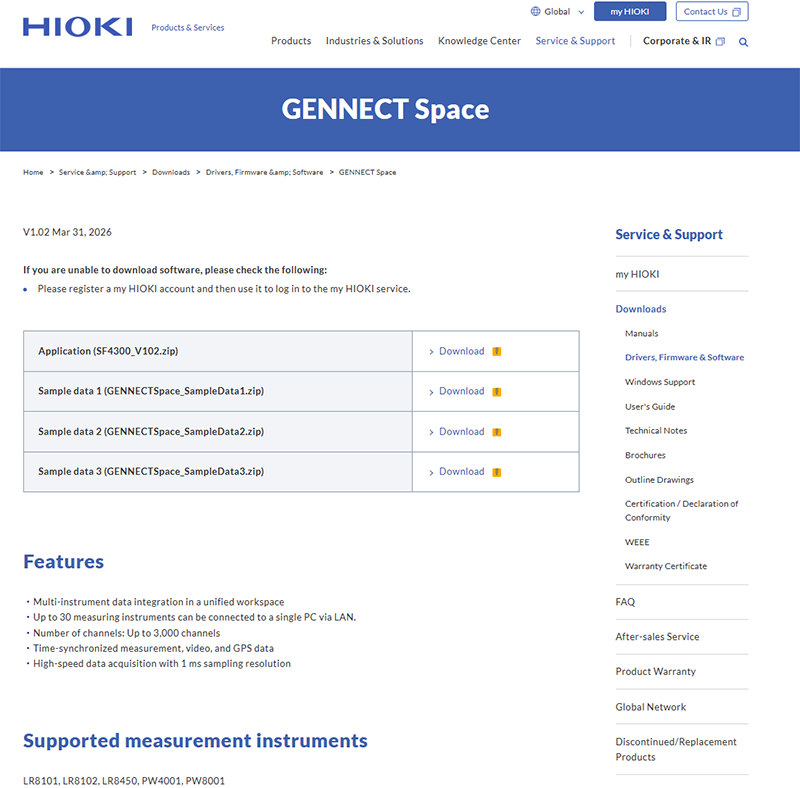
Download and install the application from your my HIOKI account. For first-time users, we recommend downloading our sample data to familiarize yourself with the interface immediately.
Estimated time: 5 min
Installation
Extract the downloaded Zip file and run the setup file.

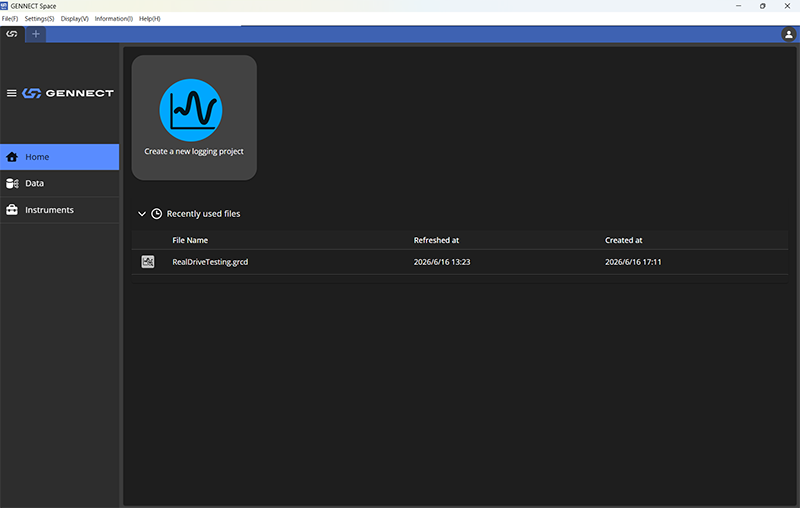
Once the installation of GENNECT Space is complete, the software will start.
3. Connect the measuring instrument
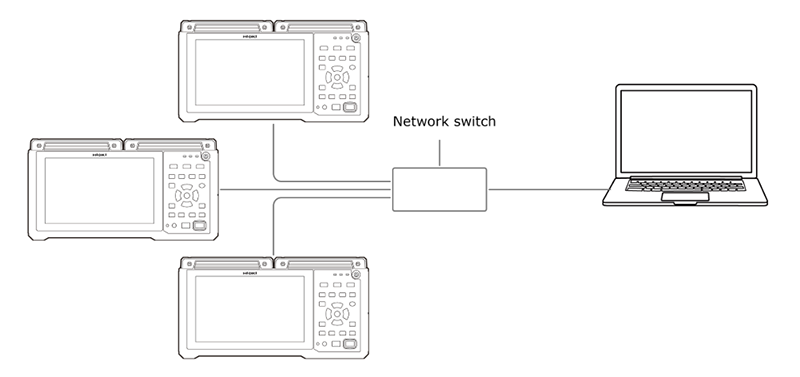
Connect your Hioki instruments to the same LAN as your PC. Navigate to the "Instrument" screen to confirm the system recognizes your devices.
Nnte: Save Time in Multi-Instrument Testing
GENNECT Space can connect up to 30 measuring instruments, allowing you to collect data from multiple instruments in one workspace. This helps reduce the time spent manually combining separate data files in Excel®, especially in large-scale tests or evaluations using different types of instruments.
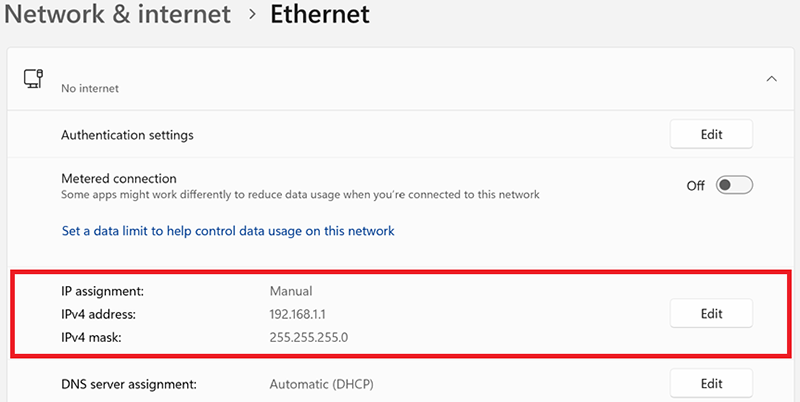
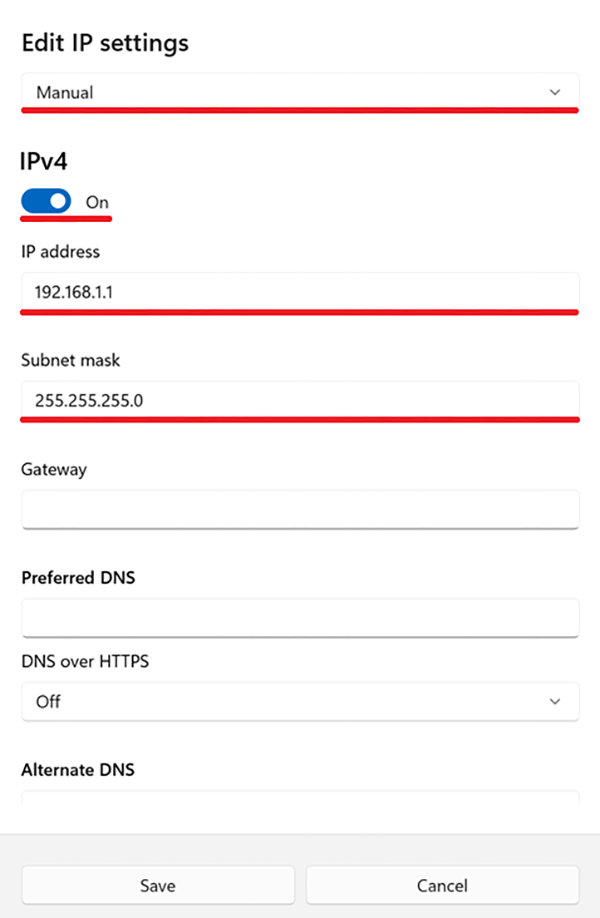
Setting example: configuring the 192.168.1.0/24 network
| Item | Device | Settings |
|---|---|---|
| IP address | Computer | 192.168.1.1 |
| Measuring instrument (first instrument) | 192.168.1.2 | |
| Measuring instrument (second instrument) | 192.168.1.3 | |
| Measuring instrument (third instrument) | 192.168.1.4 | |
| Subnet mask | ----------- | 255.255.255.0 |
| Default gateway | Computer | -------- |
| Measuring instruments | 0.0.0.0 | |
The next screenshots show how to configure the network in Windows® 11.
1. Click or right-click the Windows® [Start] button, and then select [Settings].
2. Select [Network and Internet] from the sidebar menu on the Settings screen.
3. Select [Ethernet].
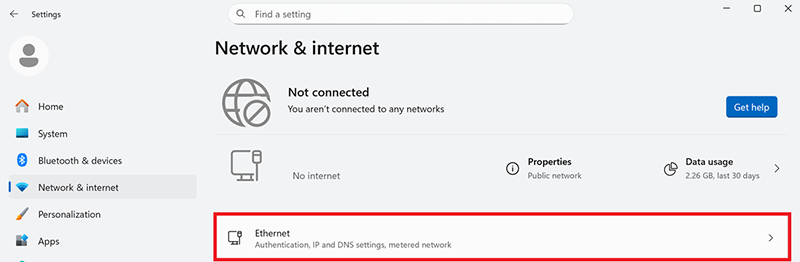
4. Check the properties of the connected Ethernet. The IP address, subnet mask, default gateway, and other information are displayed. To edit these settings, click [Edit].
5. Edit the IP address setting, and then click [Save].
4. Set your Logging Conditions
Configure the channels to record, set recording intervals, specify storage locations, and define required display panels.
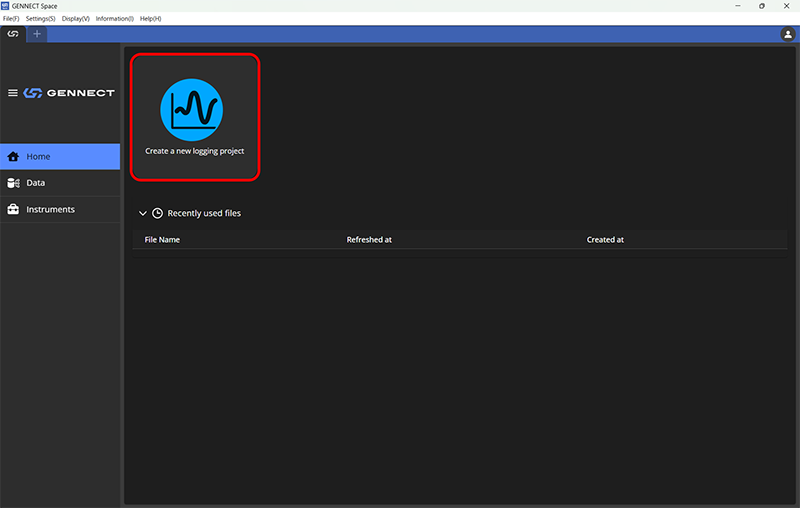
1. Click a new logging project icon.
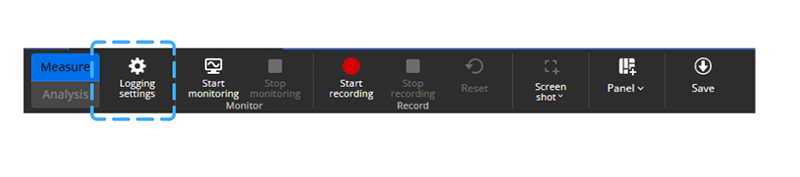
2. Once the "New Project" is created, click the gear icon in Logging settings.
3. The setting guide shows steps 1 through 4.
On the Resister Instruments screen, clicking [Search] will display a list of measuring instruments connected via LAN. Up to 30 devices can be connected.
Note: Adjust Settings Without Leaving Your Desk
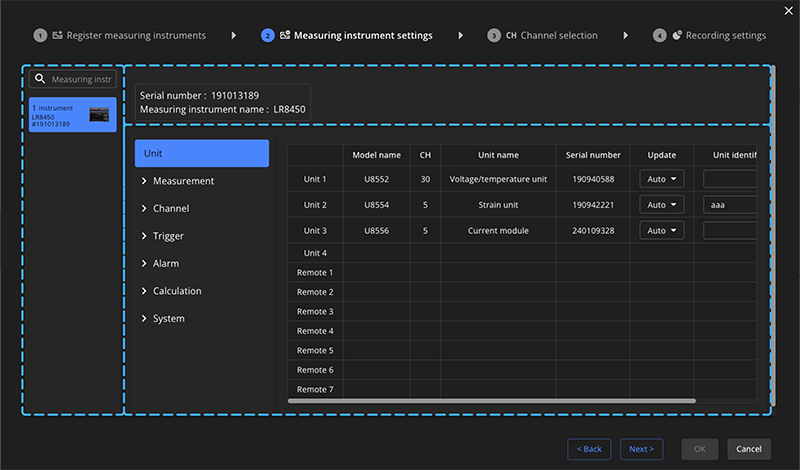
Test conditions often change during evaluation. When the input level changes, you may need to adjust the measurement range or other instrument settings. With GENNECT Space, you can make these changes from your PC, without walking back to the test floor each time. This helps you reduce setup interruptions and keep your evaluation work moving smoothly.
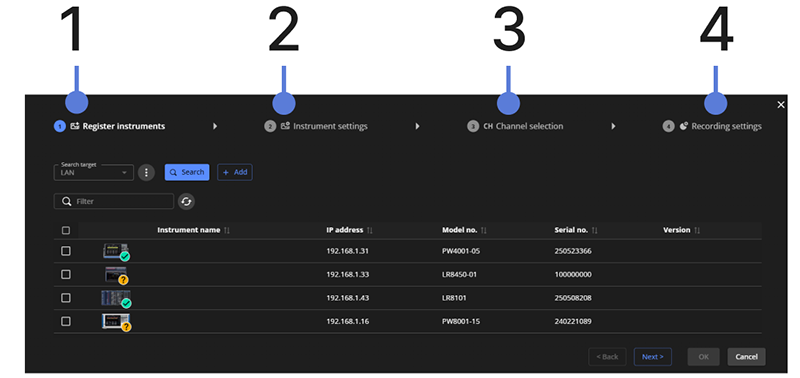
4. On the Measurement Instruments Settings screen, configure the instrument’s measurement settings. This includes settings such as measurement parameters, range, and trigger.
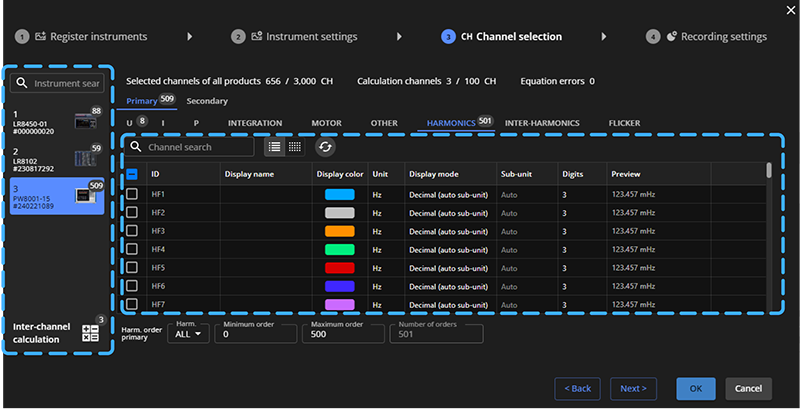
5. On the Channel selection screen, select the channels to record in GENNECT Space. Up to 3,000 channels can be selected to monitor the specific data points.
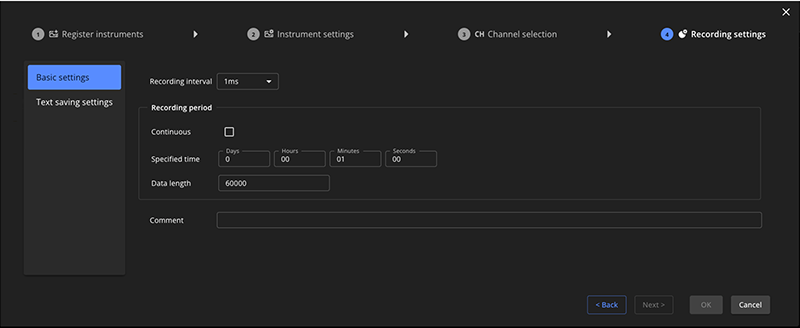
6. On the Recording settings screen, set the Recording Interval and recording duration.
The recording interval can be set from 1 ms to 1 min.
It cannot be set to a recording interval faster than that of the measuring instrument itself.
5. Start Measurement
Validate Signals: Before committing to a long-term test, verify the fidelity of your data.
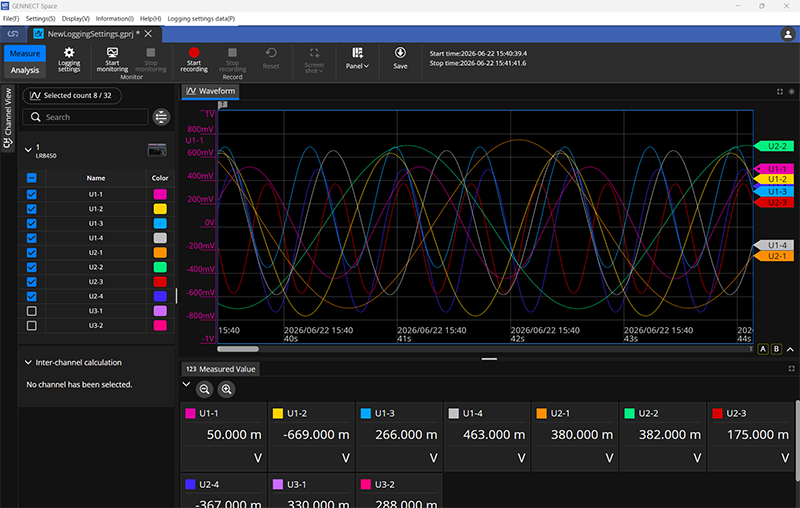
Press [Start Monitoring] to view live waveforms and numeric values, so you can confirm that your settings and intervals capture the data you expect.

Begin Recording: Once verified, begin the recording to capture your test data.
6. Save Recorded Data
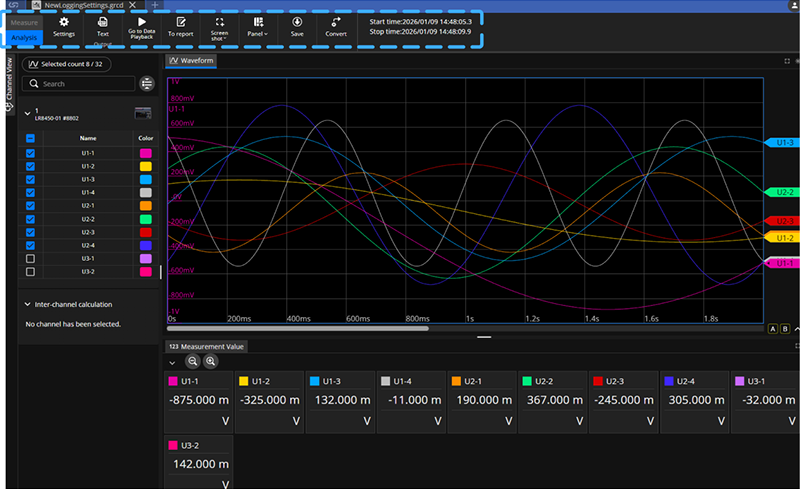
Stop the measurement and save the recorded data. After saving, move to [Analysis] to play back waveforms, export CSV, and save screen screenshots. Clicking [SAVE] saves the recording results and analysis results to the project.
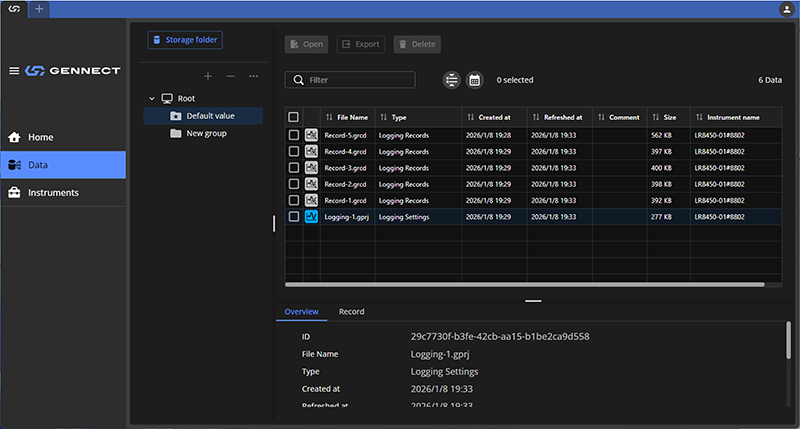
Clicking the GENNECT icon to check the saved data.
This completes the basic measurement workflow.
Start GENNECT Space Now
If you do not have a measuring instrument, use the sample data to familiarize yourself with GENNECT Space and view actual measurement data.